Friday 23 December 2016

change the DNS settings on a TP-Link AC1750 router

Login To The TP-Link AC1750

To get started configuring the TP-Link AC1750 DNS page you need to login to your router. If you are already logged in you can skip this step.
To login to the TP-Link AC1750, follow our TP-Link AC1750 Login Guide.

Change the DNS settings on a TP-Link AC1750

If you followed our login guide above then you should see this screen.

This guide begins on the Status page of the TP-Link AC1750 router. When you want to change your Domain Name System settings, or the DNS settings, click the file one left hand side of the page labeled DHCP, then DHCP Settings.

Configure the DNS section of your TP-Link AC1750


This particular page deals with the DNS server your computer uses on a regular basis. Find the Primary DNS box and enter the main address of the DNS server you have decided to use. This address is the one that is always used first. Enter the secondary address in the box below that labeled Secondary DNS. This one will only be used if the first can't be located. Finally, tick the Save button.
There is another DNS server you can change, this one usually only deals with updates, but we recommend setting both to be sure your ISP doesn't have control of your DNS servers. Click the Network button on the left side of the page. Then under that, WAN.

You are directed to a page like the one you see above.
First, tick the box that reads Use These DNS Servers. Then, enter the same primary address you entered on the previous page in the box labeled Primary DNS. Below that is the Secondary DNS. Type in the same secondary DNS server address you entered on the last page. Finish by clicking Save.
 you're done!

you might stuck somewhere with the steps or with some router issue but you not have to worry for that cause we also have better solutions for that. we as Tp link tech support team has professional and Microsoft certificated technicians who can resolve your issues . For that you just need to call our technical support team at our toll free numbers, or you can even visit our website for more informations.

Our toll free numbers are;

USA : 1888 479 2017
Australia: 1800 987 893 

web address:

Saturday 17 December 2016

CREATING A WIRELESS BRIDGE WITH A TP-LINK ROUTER

tp link wireless router extender steps


If your home is large or prone to Wi-Fi “dead spots” where the signal is weak, you can use a wireless bridge to help overcome these problems. 
 A bridge does exactly what it sounds like: it connects two Wi-Fi networks without the need for cabling. The bridge is nothing more than a second router that joins to your existing network, and extends its range.
 A bridge also increases the number of wired devices you can connect to your home network via the wired Ethernet ports on the back of it.  Anything you connect there is also connected to your home network,  enabling you to connect devices without onboard Wi-Fi, such as DVD players or game consoles.
To do this, you need two routers, a laptop, and an Ethernet cable. 
Here is how you build the bridge:
1) Write down your existing wireless settings
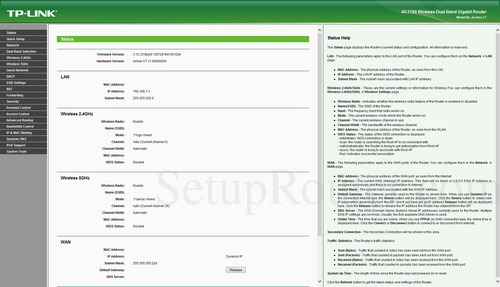
Open up the web-based management console on your existing, primary router. Browse to the Wireless/Wireless Settings section and write down the values for channel, SSID, transmission mode, and the wireless security method and password in use. You will need these value later when you configure the bridge router.
2) Connect the bridge router ( second router)
Connect the bridge router directly to your laptop with an ethernet cable plugged into any of its four LAN ports. Disable the laptop’s wifi connection, which will ensure your laptop is only talking only to the router. Power the router on, and your laptop should obtain an IP address from it.
3) Open the Administration console
Open a web browser and go to the bridge router’s administration page at 192.168.1.1; you will be prompted for the default password of admin/admin
4) Select the Wireless/Wireless Settings section.
In this section, set a different Wireless Network Name (SSID) from the one used by your primary router. Then set all of the other settings on this page to match your primary router. After making these changes, you will be prompted to reboot the router, which you must do to ensure these changes take effect. After the reboot, move on to the next step.
5) Give the bridge router a different IP.
Open the router management console once again, and select the Network/LAN section. In this section, you will see that the router has a default IP address of 192.168.1.1, which is the same IP address as your primary router. In order to avoid an IP address conflict, change the IP address of the bridge router to 192.168.1.2.  You will need to reboot the router after making this change.

6) Setup the bridge
In the router management console, browse again to the Wireless/Wireless Settings section. This time, tick the checkbox entitled “Enable WDS Bridging.”  This will open a drop-down section with a number of new settings.  You will need to fill in the “SSID(to be bridged”) and the “BSSID(to be bridged)” sections. The fastest way to do this is click the “Survey” button. This will open a new window called “AP List” which shows you all the Wi-Fi networks in range. Look for your primary router in the list by its name (SSID), and click the “Connect” link on the right.

You will notice that the SSID and BSSID sections are now filled out properly. Now simply enter the wireless security values you copied from your primary router. It should look something like this, with the sections with red arrows filled in. Save the settings, and your router will reboot and join your existing Wi-Fi network.

7) Disable DHCP
Since your primary router will be handing out IP addresses on your network, you do not want the bridged router also trying to assume this role. Select the DHCP/DHCP Settings section, and disable the DHCP server.

Then choose the System Tools/Reboot section, and reboot the router for the last time.
8) Reconnect to your primary router.
Disconnect the Ethernet cable from the bridge router and reenable your Wi-Fi. You should now see two possible SSID’s for you to connect to: the primary router and the new bridge router. Connect to the primary router, as you would normally do.
9) Validate the bridge setup.
You can perform a few tests to ensure your setup is configured correctly:
a) Browse to the administration page on the primary router. Select the Wireless/Wireless Statistics section. In this section, you should see the MAC Address of your bridge router, and some values in the Received and Sent Packets counters, indicating the connection is working. It should look like this:
Note that the MAC address of your bridge router should be printed on the bottom of the device.
b) Browse to the 192.168.1.2 address, which is the management console of the bridge router. You should be able to resolve this address and login to the adminstration page on the bridge router without issue.
If both of these test pass, you should be reasonably certain your bridge is configured correctly and running.

10) Connect to the bridge

Now reset your Wi-Fi connection to the SSID of the bridge router.  You should be able to connect successfully, get an IP address through the primary router, and be able to connect to the Internet. You should also be able to connect a wired device to any of the LAN ports on the router and get to the Internet as well.

11)  If any issue occurs in between you easily call our toll free number or you can log on to our web site for more informations.
                                                        

We are official Technical Partners with Microsoft.

Our TP -Link technical support experts . Can resolve all kinds of issues related to TP-Link Router such as installation, upgrade, configuration, uninstallation, securing network and Wi-fi, resetting passwords etc.
Toll free number:
USA : 1888 479 2017
Australia: 1800 987 893


Tuesday 6 December 2016

Change the WAN Connection Type to Dynamic IP for TP-link router

Change the WAN Connection Type to Dynamic IP.

Before you install the TP-Link Router, if your computer (directly connected to your ADSL\Cable modem) is able to access the Internet automatically without running any additional program, please use Dynamic IP as the WAN connection type. TP-LINK Router use Dynamic IP mode by default

Step1   Open the web browser and type the LAN IP address of the router in the address bar, the default IP address of TP-LINK router is 192.168.1.1 or 192.168.0.1, and then press Enter.


Note: if you can not access the web page, please check the IP address of your computer or reconfigure the IP address of your computer.
 
Step2    Type the username and password in the login page, the default username and password  are both admin.


Note:
1. If you got a server error -401, it means you entered a wrong username or password.

    If you forget the user name or password that you set, you need to reset the router to factory default settings.

 
2.  If the login page can not display, please call us at 1888 479 2017 to check the problem.
 
Step 3  Click Network->WAN in the left menu , and change the WAN Connection Type to Dynamic IP Address then click the Savebutton.


Step 4    Wait for a few minutes and check the WAN part on the Status page,  if it shows any IP address (similar as below), that means the connection between the Router and the Modem is established.


Step 5  IF still there are errors than easily you can fix it by taking help of experts for that you just have to call our Microsoft certificated technicians. Our certified experts aims at delivery quality and instant support assistance for TP-link. The professionals won’t leave your issue in the middle; they are committed for delivering reliable solution to every technical problems a user comes across. 

or log on to our website: 

Wednesday 23 November 2016

SETTING UP TP-LINK ROUTER AS A REPEATER

Configuration on Repeater (TP-Link 11n AP):
Step 1
Log in to the Repeater’s management page. 

Step 2
Click Network. Please make sure the Repeater’s IP address is in the same IP segment with the Root Router and avoid the IP conflict. In this instance, we can change the IP to “192.168.1.250”. Then click Save


Step 3

Click Wireless ->Wireless Settings. Select Universal Repeater as the Operation Mode. Then click Search. (If the root router supports four address WDS, you can also select Repeater.)

Step 4

Find the root router’s SSID on the AP list, and then click Connect.

Step 5

Click Save.

Step 6

Click Wireless ->Wireless Security. You need to get the Security type and the Wireless password(Network Key) of your root Router. 

Step 7

Click System Tools-> Reboot to reboot the AP.
After you go through all the above steps, the Repeater should get working properly with the root router.

                              IF ABOVE STEPS DOSE'NT  HELP YOU FOR THAT YOU TAKE TECHNICAL HELP FROM OUR TEAM EASILYour routers may lead you into different issues with your internet connection or network. Different types of issues such as installation, outdated drivers and incomplete setup gives you hard time working flawless on internet. Our technicians completely understand all these issues with routers and are well trained at fixing them for you.

Call Us Now!1-888-479-2017 (Toll-free)

Get Instant TP-Link Technical Support

Saturday 12 November 2016

office 365 customer support number 0800 820 3300

Norton antivirus tech support number 1888 479 2017

How to use two wireless routers to extend range of Tp-link router


Two routers is often the best solution to poor wireless ROUTERS, giving you a seamless and quick way to extend Wi-Fi range. If you've gone down the HomePlug wireless access point route, the instructions here are similar, but check your product's manual for full instructions and how to configure it.
STEP 1 - Connect to your Tp-link router
 First Connect to your primary router's (the one connected to broadband) web-based management page and navigate to the DHCP settings, which are most likely under the LAN settings. DHCP is the protocol that deals with network addresses for connecting devices, as each one must have its own unique IP address. An IP address is made up of four numbers separated by full stops, such as 192.168.0.2.
The DHCP server information will tell you the first address that is handed out, such as 192.168.0.2. It will then either tell you the last address, such as 192.168.0.100, or the number of addresses it hands out. NOW, you add the number of addresses to the last number of the starting address to get the end address. If the number of addresses was 100 and the starting address was 192.168.0.2 the last address would be 192.168.0.102.
You need to note down an IP address that falls outside of this range and is not the same as your router's IP address. This means keeping the first three numbers the same, such as 192.168.0, and picking the final number, which can be between 1 and 254. In both of our examples above, 192.168.0.200 would work.


Step 2 - Configure the new Tp-link router
Next turn on your new router, but don't connect it in any way to your existing router. Instead, plug a computer into the new router via Ethernet and visit its web management page.
Look out for the router's IP address setting. This must be for the LAN interface, not the WAN interface, which is for the internet: the two addresses are separate and not related. Change the router's IP address to the one that you found was safe in Step 1 of this guide (192.168.0.200 in our example). Your router may restart. If it does, you'll need to connect to its web-based management page again, this time typing the router's new IP address into your browser.
If your computer won't connect, it's possible that it's still holding on to an old IP address, so you'll need to make it refresh its settings. The easiest way to do that is to unplug the Ethernet cable from your computer and plug-it in again. Once you're connected to your router again, find the DHCP page and select Disable. Click Save to apply the changes. You'll most likely be disconnected from the router, but that's fine for now.

STEP 3 - Connect the two routers together
Disconnect your computer from your new router, as it's time to connect it to your broadband router. You can either do this step using an Ethernet cable, or you can use HomePlug between them: both do the same job. Plug one end of an Ethernet cable into a spare Ethernet port on your broadband-connected router. Plug the other end into a spare Ethernet port on your new router: not the WAN port, as this will not work.
If you're using HomePlug, you'll need two Ethernet cables: one from the new router to a HomePlug adaptor, and one from a HomePlug Adaptor to the old internet-connected router.


STEP 4 - Configure both routers to use the same Wi-Fi network
Connect wireless to your home network, as you would normally. Get up a browser and type in your new router's IP address to access its web-based management. Go to the wireless settings and input the same network name and security settings as for your existing wireless network. Make sure you pick a new channel that doesn't overlap with the existing network's channel (this is for both 2.4GHz and 5GHz networks) and that you've configured both routers to use optimal settings, as per our 2.4GHz and 5GHz guides. Save the settings. You've now got one big wireless network, with excellent range and throughputs.


For more technical help you  can call our tech support team for that at 1888 479 2017.we aim to provide you the instant technical support for TP-Link and we’re committed to deliver the best technical support. Our Microsoft certified experts can resolve any type of TP-Link Router related issues. We are never contented with our efforts until you get all your issues resolved.
or log on to